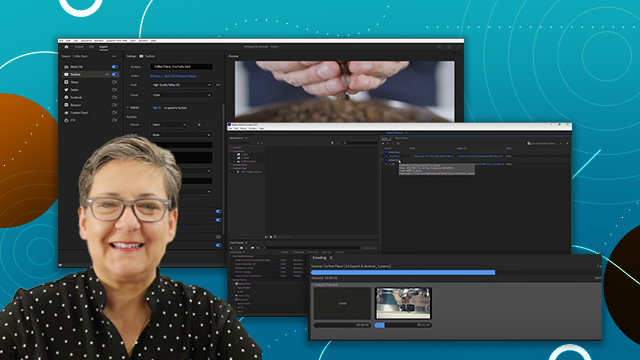
Home > Archiving

Luisa Winters

Instructor and consultant for Adobe products

linkedin-icon

Archiving

Learn how to export your videos with Adobe Media Encoder. Learn how to use presets and what parameters you need to to post to social media.

This summary is AI generated

Learning Outcomes:

  • Archive projects using Premiere Pro's project manager
  • Transcode footage to QuickTime format
  • Calculate project size before and after archiving

Level: Intermediate

Skills you'll gain:

Premiere Pro, Archiving, Transcoding, Project Management

Key Insights

  • Use the project manager for efficient archiving.
  • Consolidate footage to reduce project size.
  • Select appropriate transcoding settings for quality.
  • Exclude unused clips to save space.
  • Include handles for future editing flexibility.
  • Convert image sequences to clips for consistency.
  • Rename files to match clip names for organization.
  • Preserve transparency for visual integrity.
  • Calculate project size to manage storage effectively.

Learning outcomes

  • Archive projects using Premiere Pro's project manager
  • Transcode footage to QuickTime format
  • Calculate project size before and after archiving

Key insights

  • Use the project manager for efficient archiving.
  • Consolidate footage to reduce project size.
  • Select appropriate transcoding settings for quality.
  • Exclude unused clips to save space.
  • Include handles for future editing flexibility.
  • Convert image sequences to clips for consistency.
  • Rename files to match clip names for organization.
  • Preserve transparency for visual integrity.
  • Calculate project size to manage storage effectively.

Skills

Premiere Pro, Archiving, Transcoding, Project Management

Transcript

[00:00:00] [Music]

[00:00:10] welcome to this premiere pro tutorial on

[00:00:12] archiving i'm luisa winters

[00:00:15] let's start by opening the project named

[00:00:18] 14 export and archive

[00:00:21] this is the project we have been working

[00:00:23] with for export

[00:00:26] if you have not downloaded the project

[00:00:28] files please go ahead and do so now

[00:00:33] now we're done editing and exporting our

[00:00:35] project

[00:00:36] all that is left to do is archive it

[00:00:38] just in case we need to reference it at

[00:00:41] a later date in premiere we can use the

[00:00:43] project manager to accomplish this

[00:00:46] let's make sure that the coffee place

[00:00:48] sequence is active

[00:00:52] and now go to file

[00:00:56] project manager

[00:01:02] if the coffee place sequence is not

[00:01:04] checked in here make sure that you check

[00:01:07] it

[00:01:08] we could use the others as well but

[00:01:10] those are already nested in the coffee

[00:01:13] place sequence so there's no need to

[00:01:15] check them we will choose to consolidate

[00:01:17] the footage and transcode it so for this

[00:01:20] one the source will be the sequence

[00:01:28] and we will transcode it to quicktime

[00:01:31] so we will choose that from this drop

[00:01:33] down menu

[00:01:34] and for the preset we will choose match

[00:01:37] source

[00:01:38] and apple prores 422 lt

[00:01:41] we can change the destination path so

[00:01:44] let's click on browse and i'll create a

[00:01:46] new folder on my desktop

[00:01:54] i'll call this folder archive

[00:01:59] now let's go ahead and calculate the

[00:02:01] size of the current project

[00:02:04] versus the size of the archived one

[00:02:07] to do that just click on this button

[00:02:10] here and you can see my values

[00:02:12] this is the original project size

[00:02:15] which is

[00:02:17] 498.28 megabytes

[00:02:19] and here's the resulting project size

[00:02:22] which is

[00:02:24] 472.21 megabytes

[00:02:26] you can also see how much space i have

[00:02:29] left on my hard drive

[00:02:31] there are other options that you can

[00:02:33] check in here

[00:02:34] you can choose to exclude unused clips

[00:02:38] and of course we want that

[00:02:40] you can also include handles and 30

[00:02:43] frames is a good number

[00:02:46] you can convert image sequences to clips

[00:02:50] you can rename files to match clip names

[00:03:02] you can also convert after effects

[00:03:04] compositions to clips

[00:03:06] and finally you can choose to preserve

[00:03:10] transparency that's the alpha channel

[00:03:14] now let's click ok to start the process

[00:03:16] and let's save it

[00:03:24] this dialog opens up because there are

[00:03:26] discrepancies within the clips and

[00:03:28] premiere is just telling us click ok

[00:03:35] the transcoding happens and now we have

[00:03:37] an archived project

[00:03:40] this is what the files look like

[00:03:43] you can see the clips in here and even

[00:03:45] the project file

[00:03:46] in the future we will be able to open

[00:03:48] this project and go back to what it was

[00:03:52] when we archived it

[00:03:55] this brings us to the end of this video

[00:03:58] about archiving in premiere pro

[00:04:00] i'm luisa winters thank you for watching

[00:04:03] and see you next time

[00:04:07] [Music]

[00:04:33] you