
Media Intelligence and Effects
Learn how to search assets and use source patching to streamline your workflow. Enhance your video with techniques like adjusting opacity, fixing shaky footage, basic color correction with the Lumetri Panel, color matching, removing attributes, adding effects via adjustment layers, creating default transitions, and incorporating sound effects and motion graphics templates.
This summary is AI generated
Learning Outcomes:
- Utilize media intelligence for efficient clip searching.
- Apply color correction using Lumetri Color.
- Implement stabilization techniques for shaky footage.
Level: Beginner
Skills you'll gain:
Premiere Pro, Color Correction, Video Editing, Audio Enhancement
Key Insights
- Use the search panel to quickly find clips by keywords.
- Understand source patching to control clip placement in tracks.
- Utilize the overwrite shortcut to avoid ripple edits.
- Adjust opacity for seamless transitions between clips.
- Apply Warp Stabilizer to stabilize jittery footage.
- Use Lumetri Color for exposure and color adjustments.
- Create adjustment layers for global color corrections.
- Utilize essential sound panel for audio enhancements.
- Leverage graphics templates for professional-looking titles.
- Organize project files effectively with bins.
Did the AI summary help? Let us know.
Learning outcomes
- Utilize media intelligence for efficient clip searching.
- Apply color correction using Lumetri Color.
- Implement stabilization techniques for shaky footage.
Key insights
- Use the search panel to quickly find clips by keywords.
- Understand source patching to control clip placement in tracks.
- Utilize the overwrite shortcut to avoid ripple edits.
- Adjust opacity for seamless transitions between clips.
- Apply Warp Stabilizer to stabilize jittery footage.
- Use Lumetri Color for exposure and color adjustments.
- Create adjustment layers for global color corrections.
- Utilize essential sound panel for audio enhancements.
- Leverage graphics templates for professional-looking titles.
- Organize project files effectively with bins.
Skills
Premiere Pro, Color Correction, Video Editing, Audio Enhancement
Transcript
[00:00:00] the manufacturer said to do except it
[00:00:02] kept falling. So I took two sestands to
[00:00:06] and then here too I can insert a cut
[00:00:09] command K while having that selected and
[00:00:12] then the second half of it I will zoom
[00:00:16] in and refframe a bit to hoist it up
[00:00:20] there and hold it up there. Well, they
[00:00:23] actually created dents in the molding.
[00:00:27] So, here I have a marker for tennis
[00:00:29] balls, but try as I might, I can't
[00:00:31] actually find in my B-roll string out
[00:00:34] where I have my tennis ball clip. So,
[00:00:36] instead of going back to my bin here and
[00:00:40] trying to find the tennis ball footage,
[00:00:42] I can just search for it as a keyword.
[00:00:44] This is called media intelligence and
[00:00:47] search panel. I'll go up to window and
[00:00:50] pull up the search panel. And in the
[00:00:52] search panel, you can search for
[00:00:54] visuals, text, metadata, or everything.
[00:00:57] So, I'll search for visuals. And I want
[00:00:59] the visual of a tennis ball. I'm telling
[00:01:02] it in this whole project, please find me
[00:01:04] a tennis ball visual. Tennis ball.
[00:01:08] And it found the two clips that have
[00:01:10] tennis balls. And I can actually hover
[00:01:12] scrub over it to get a little preview of
[00:01:14] what's in the clip. This is not the best
[00:01:15] one, but I think this one will work.
[00:01:20] So I can open it up here.
[00:01:23] Nice.
[00:01:25] I will choose a good section of it. I
[00:01:28] and O. I only want to drag the video
[00:01:31] portion of this part of this tennis ball
[00:01:35] clip into here in this sequence. So I
[00:01:39] can just hover over the drag video only
[00:01:42] icon and
[00:01:45] put it in. Another way to do this is to
[00:01:48] use our comma shortcut. So, watch what
[00:01:52] happens. I put my playhead here. I go
[00:01:54] over to the clip and I press comma.
[00:01:57] What did it do? Well, it definitely
[00:02:00] inserted the clip, but it also rippled
[00:02:03] everything backwards. And it inserted it
[00:02:06] on the V1 layer over here where our A-
[00:02:11] roll is. And I really wanted it to go on
[00:02:13] the V3 layer. I also didn't want it to
[00:02:15] ripple. So the comma insert shortcut is
[00:02:19] the wrong one. You want to do the
[00:02:21] overwrite shortcut. So instead of doing
[00:02:23] comma, we do period.
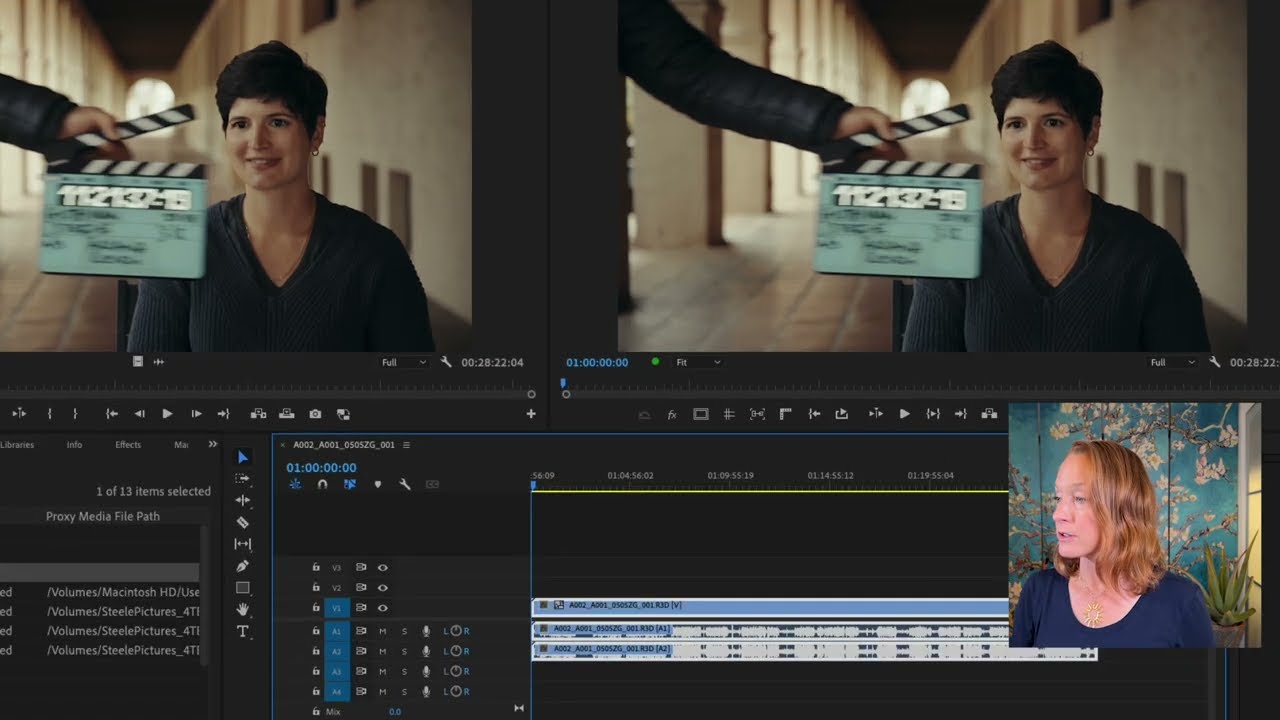
[00:02:27] It was the right shortcut, but source
[00:02:29] patching was on the wrong layer. The
[00:02:31] source patching is this highlight next
[00:02:34] to V1. It's telling the software that
[00:02:37] when you are bringing clips in, they're
[00:02:40] going to go onto the track V1 and onto
[00:02:43] the track A1. If I want to overwrite
[00:02:46] that clip and put it on the V3 layer,
[00:02:49] I'm going to have to make sure that the
[00:02:50] source patching is on V3
[00:02:55] as well as
[00:02:57] on
[00:02:59] A4. And I'm going to mute A4 cuz we
[00:03:02] don't want to hear it. So now when I
[00:03:04] press period or I go over here to
[00:03:06] overwrite, same thing.
[00:03:10] That clip goes onto the V3 track and the
[00:03:13] audio goes onto the A4 track just where
[00:03:16] I have
[00:03:18] source patched it. All right, let me
[00:03:20] continue putting all the B-roll into the
[00:03:22] sequence through a combination of
[00:03:25] dragging it over from the pancake B-roll
[00:03:28] string out or pulling it up from the
[00:03:30] original footage using the overwrite
[00:03:32] shortcut. All right, I'm almost done
[00:03:35] laying out all of the B-roll. What's
[00:03:37] left is just the beginning bit which is
[00:03:39] the before and after and also the call
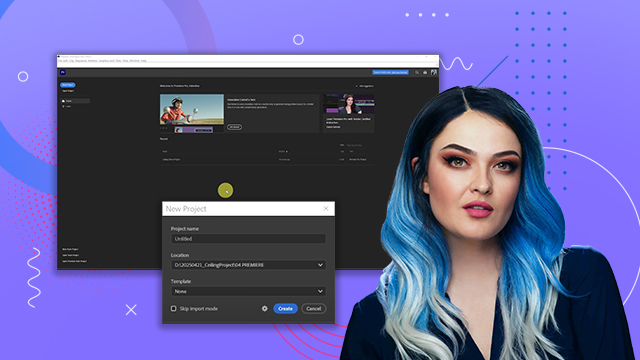
[00:03:42] back to the previous video. So for the
[00:03:45] call back to the previous video I am
[00:03:47] going to actually import my previous
[00:03:51] export. So, over here in my main folder
[00:03:54] organization, I'll add another bin and
[00:03:56] I'll call it 06 exports.
[00:04:00] And I'll go to my main folder in exports
[00:04:02] where I exported that first project. And
[00:04:04] I'll drop it in.
[00:04:07] And now I can use that as B-roll as
[00:04:09] well. I showed you how I did the track
[00:04:12] lighting in the ceiling, but
[00:04:17] I showed you. So, right there is where
[00:04:19] I'm going to put it in. So, let's find
[00:04:22] kind of the best section. Maybe
[00:04:28] maybe right here
[00:04:31] where I have that little chase sequence
[00:04:33] that happens in the track lighting. So,
[00:04:35] I and
[00:04:38] I'll use a little bit before I'm going
[00:04:42] left on my keyboard to go one frame at a
[00:04:44] time. That's good. I press period to
[00:04:47] insert that clip in. Let's insert a
[00:04:52] different clip in. Let's do this one. I
[00:04:58] [Music]
[00:05:00] and O and then period. The other piece
[00:05:03] of B-roll that I want to put in is the
[00:05:05] before and after. So, I'm going to go to
[00:05:08] my footage folder. Molding. I know that
[00:05:10] I have the befores here. So, let me
[00:05:12] choose. This is a good before
[00:05:17] because it sort of shows you a little
[00:05:19] bit more of this wooden wall. So, I'm
[00:05:21] going to drag that in as the before. And
[00:05:25] then I'm going to go all the way to the
[00:05:26] bottom. This is the after. And what I
[00:05:29] want to do is almost line these up
[00:05:31] perfectly so that when I say before and
[00:05:33] after, it's like and it cuts. So, what
[00:05:37] I'm going to do first is I'm going to
[00:05:39] put this after clip on top of
[00:05:42] everything. And just like the audio
[00:05:44] tracks that have this white line that go
[00:05:46] through every single audio track and
[00:05:48] that is the indicator of the loudness,
[00:05:51] the video tracks have a white line as
[00:05:54] well. And that is an indicator of the
[00:05:56] opacity. So that'll help me sort of line
[00:05:59] up these two clips so it looks like one
[00:06:02] transitions into the other seamlessly. I
[00:06:05] will select the top clip and I will drag
[00:06:07] that white line down so that my opacity
[00:06:10] is less so I can see through it. And it
[00:06:15] looks like it's fairly the same size
[00:06:17] except maybe I use the chandelier and
[00:06:19] the sconces to line it up. So I'm going
[00:06:23] to nudge this top clip to the left a few
[00:06:27] frames by holding down alt and going
[00:06:30] left on my keyboard. Nudge, nudge,
[00:06:32] nudge. I'm going to keep nudging it
[00:06:35] until it more or less lines up with the
[00:06:39] bottom clip.
[00:06:42] Keep nudging. Okay, it looks like it's
[00:06:46] sort of lining up, but not quite. The
[00:06:49] sconces aren't quite lined up. So, one
[00:06:52] of these needs to be larger.
[00:06:55] Let's try the top one. If I go to scale
[00:06:58] and I try to scale it up, that looks a
[00:07:00] little bit more accurate. Now, I can
[00:07:04] change the position over here in the
[00:07:07] transform controls. And I actually want
[00:07:09] to be doing this not right here because
[00:07:12] that's way after I say the word after.
[00:07:15] So, this is where I need that match to
[00:07:18] happen. Let me play around with the
[00:07:19] scale a little bit more,
[00:07:21] the position a little bit more.
[00:07:25] And that looks pretty good to me. So I
[00:07:28] will take this opacity back up to 100%.
[00:07:30] I will do command K to cut. And then I
[00:07:33] will just delete this top clip.
[00:07:37] I also have to trim this end of this
[00:07:41] clip as well and delete the end. So
[00:07:43] let's see what this looks like from
[00:07:44] looking like this to this. In my last
[00:07:49] video, I'm going to save that. And I am
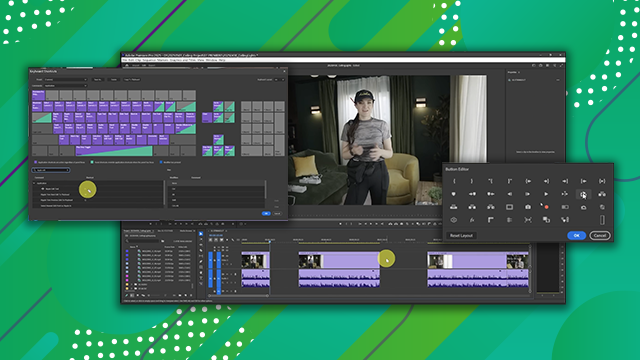
[00:07:52] done with laying B-roll. There are also
[00:07:56] a few clips that could use stabilizing.
[00:07:58] For example, this one is very jittery as
[00:08:00] I play it back. These styrofoam pieces,
[00:08:02] they just kind of got even in slow
[00:08:04] motion. It's pretty jittery. If we go to
[00:08:06] our effects window, which is a new
[00:08:08] window we haven't seen before, and if
[00:08:10] you lose it, it's up here under window
[00:08:12] effects. I can go to our video effects,
[00:08:17] distort,
[00:08:19] warp stabilizer, which is Premiere's
[00:08:22] internal stabilization. So, we just drag
[00:08:25] that directly onto the clip. Under
[00:08:28] effect controls is where we can control
[00:08:30] what we want the effect to look like. By
[00:08:32] default, it does a subspace warp type of
[00:08:35] stabilization. And because I don't want
[00:08:37] it to do too much, I'm going to select
[00:08:40] preserve scale.
[00:08:42] Let's select just this portion of the
[00:08:45] timeline by pressing the forward slash.
[00:08:49] Make sure we have loop playback enabled
[00:08:51] and just play it back. See what the
[00:08:52] stabilization did everywhere. Foam
[00:08:55] pieces, they just kind of Oh no. See
[00:08:57] that little jump that it did? That's
[00:09:00] worse than having the stabilization off.
[00:09:02] I can toggle it on and off by pressing
[00:09:04] this effects button in the corner.
[00:09:08] So this is without. They just kind of
[00:09:10] got everywhere. The foam pieces, they
[00:09:12] just kind of got everywhere. The foam
[00:09:14] pieces, they just kind And this is with
[00:09:17] kind of got everywhere. The foam pieces,
[00:09:19] they just So maybe a different
[00:09:21] stabilization is in order. Instead of
[00:09:23] subspace, I'm going to do position,
[00:09:25] scale, rotation,
[00:09:28] and then let's see what it looks like.
[00:09:30] Kind of got everywhere. The foam pieces,
[00:09:32] they just kind of got everywhere. The
[00:09:34] foam pieces, they That's great. So, this
[00:09:36] type of stabilization is what I need.
[00:09:39] I'm going to add this to a couple of
[00:09:40] other clips. So, I'm going to select the
[00:09:42] word warp stabilizer, command C to copy
[00:09:45] it, and find some more clips that need
[00:09:47] stabilization. Like, for example, this
[00:09:49] tennis ball clip.
[00:09:52] If I just play it the way that it is, it
[00:09:55] was just taking way too long. And I was
[00:09:57] rack. It was just taking way too. But I
[00:10:00] add the warp stabilizer.
[00:10:02] Command V.
[00:10:04] And then I click analyze.
[00:10:08] This is what it looks like. Too long.
[00:10:10] And I was rack. It was just taking way
[00:10:12] too long. I'm sure you've noticed that
[00:10:14] some of these clips are a little too
[00:10:16] dark. So for our next step, let's adjust
[00:10:18] the color. And we're going to go over to
[00:10:20] lummetry color or window and find
[00:10:23] lummetry color and open it up. Now it's
[00:10:26] all grayed out until you actually select
[00:10:28] a clip. So the first clip that we want
[00:10:30] to adjust is probably this one because
[00:10:33] it's quite a bit darker than the clips
[00:10:36] prior. So once you select it, all of the
[00:10:39] lummetry color controls come into view.
[00:10:43] And just like on your phone or on
[00:10:46] Photoshop, you know these sliders very
[00:10:49] well. Exposure
[00:10:52] slider, right? Contrast, making the
[00:10:54] darks darker and the brights brighter.
[00:10:56] Highlights,
[00:10:58] making the lights brighter, shadows,
[00:11:00] making the shadows brighter, whites, and
[00:11:03] then we have blacks. Those are kind of
[00:11:06] our basic controls. If you want to go
[00:11:10] back to the original, you can click
[00:11:12] reset. There's also an auto button, and
[00:11:15] if you click that, it does its best, but
[00:11:18] you can actually also add some of your
[00:11:21] own flavor from there. So, for example,
[00:11:23] I'm going to increase exposure here and
[00:11:25] I'm going to increase the shadows. Maybe
[00:11:27] increase the saturation as well. I can
[00:11:30] toggle this on and off under effect
[00:11:33] controls. You can see that the lummetry
[00:11:35] color control has been added. So, I can
[00:11:38] just press this effects button to toggle
[00:11:40] it on and off. I think you're seeing a
[00:11:43] pattern here. any effect or any part of
[00:11:47] the clip can be adjusted and toggled
[00:11:50] here in the effect controls window. So
[00:11:53] now that I know that this clip is good,
[00:11:55] I want to apply that same lummetry color
[00:11:57] to the next several clips which are also
[00:12:00] dark. So I'm going to select the word
[00:12:02] lummetry color, command C, and then
[00:12:07] paste it across the next several clips.
[00:12:11] One, two, and three. Ah, that one might
[00:12:14] be a little too bright. Let's take the
[00:12:16] exposure down.
[00:12:18] What other clips need higher exposure?
[00:12:20] This one, definitely. So, let's paste
[00:12:23] that same lummetry color. Even with that
[00:12:26] pasted, I feel like we still need more
[00:12:28] saturation.
[00:12:31] And under creative, we can even give it
[00:12:33] some more vibrance.
[00:12:35] There we go. Maybe even back to basic.
[00:12:39] And increase the shadows. Increase the
[00:12:42] contrast a little bit.
[00:12:44] Yeah, I feel like that's a huge
[00:12:46] difference before and after. Select
[00:12:48] lummetry color. Copy cuz the next couple
[00:12:52] clips are under similar lighting. And
[00:12:54] this is one of those where now maybe it
[00:12:57] makes sense to go to sequence and
[00:12:59] selection follows playhead. So every
[00:13:01] time I move the playhead, it selects the
[00:13:03] clip underneath it. Definitely this
[00:13:05] tennis ball shot can use a bit more
[00:13:07] exposure, but when I add it, it actually
[00:13:09] blows out the tennis ball. So, let me
[00:13:11] take the highlights down and maybe the
[00:13:13] whites down so that the tennis ball
[00:13:16] still has some detail in it. This one is
[00:13:18] a little too stark white. I would like
[00:13:22] it to be a little warmer. So, I'm going
[00:13:24] to adjust the temperature slider on that
[00:13:26] one so that the color of the paint
[00:13:28] matches.
[00:13:30] There we go. That one, too, could be a
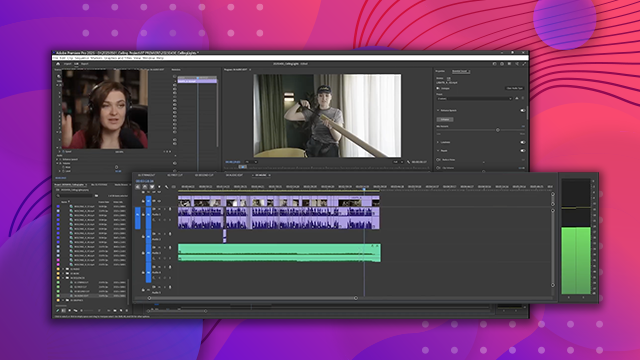
[00:13:32] touch warmer. Okay, now let's take a
[00:13:34] look at our A-roll. Actually, because
[00:13:37] these two shots don't exactly match. So,
[00:13:40] instead of going back and forth, back
[00:13:42] and forth, back and forth trying to
[00:13:44] adjust the color, we will scroll all the
[00:13:46] way down here to color wheels and match.
[00:13:49] And we will open comparison view. So,
[00:13:52] comparison view basically says, hey, the
[00:13:55] clip that I'm currently working on is
[00:13:58] the one on the right. The clip that I
[00:13:59] want to match to is the one on the left.
[00:14:02] So, I have to choose which look I like
[00:14:05] better, the wide or the close-up. I
[00:14:08] think I like the wide better. So, the
[00:14:10] close-up is the thing that I'm going to
[00:14:12] adjust. So, because I have put my
[00:14:14] playhead over this clip, and this is the
[00:14:16] clip that's selected, that's the clip
[00:14:18] that's being pulled up here in this side
[00:14:21] of the monitor. On this side is the clip
[00:14:24] that I want to match to. So, I'm
[00:14:28] basically telling the program, hey, take
[00:14:30] this as an example and match this to
[00:14:35] that. I also want to make sure that I
[00:14:36] have face detection enabled because
[00:14:38] that'll help match the skin tones. And
[00:14:41] let's click apply match.
[00:14:45] That did a pretty good job. I will say
[00:14:48] maybe it has a little bit too much
[00:14:50] contrast. So, let me take the contrast
[00:14:53] down. and maybe just a tad bit more
[00:14:56] warmth and then tint it green just a
[00:14:59] smidge. But that looks pretty accurate.
[00:15:03] I'm happy with that. So if I toggle the
[00:15:06] lummetry color in the effect controls
[00:15:08] panel on and off, you'll see the before
[00:15:11] and the after. The after matches with a
[00:15:14] cam a lot better. So instead of taking
[00:15:17] this lummetry color, copying it, and
[00:15:20] then trying to paste it to every
[00:15:22] instance of this magenta color or
[00:15:26] zooming out on the entire project by
[00:15:29] doing that backslash key and then trying
[00:15:34] to select all of the pink clips. There's
[00:15:38] a much quicker way to do it. We're just
[00:15:41] going to rightclick, go to label, select
[00:15:45] label group, then deselect the one that
[00:15:47] already has the lummetry color.
[00:15:49] Otherwise, we're adding the lummetry
[00:15:50] color effect twice by holding down shift
[00:15:53] and deselecting it and then doing
[00:15:56] commandV
[00:15:58] to paste. And now you can see that that
[00:16:02] color has been applied across to every
[00:16:06] single
[00:16:07] Bcam clip.
[00:16:10] I'm going to get out of comparison view.
[00:16:12] The comparison view buttons right here.
[00:16:16] Now, let's say that I also want to add
[00:16:18] something to a cam like another lummetry
[00:16:20] color effect for exposure. Increase the
[00:16:23] exposure here.
[00:16:26] Copy the lummetry color. Rightclick
[00:16:29] label. Select label group. Deselect the
[00:16:32] one that I already added it to and
[00:16:34] paste. And then now it doesn't match
[00:16:37] with the Bcam anymore. So then I have to
[00:16:40] select all the Bcam stuff, label, select
[00:16:43] label, group, and then paste that there
[00:16:45] as well. So now it matches more or less.
[00:16:49] And then I came back to the project a
[00:16:51] few days later and I was like, "Oh,
[00:16:54] actually, I really don't like this
[00:16:56] change and I want to remove it." Well,
[00:16:59] if I click on one of the clips,
[00:17:03] I can access that lummetry color and I
[00:17:05] can just delete it by pressing delete.
[00:17:07] But if I select multiple clips, what
[00:17:10] happens is that I don't see the effect
[00:17:12] controls anymore. And in the properties
[00:17:15] panel, there is no lummetry color. This
[00:17:17] is just transform, crop, and audio. So,
[00:17:21] what do I do? How do I delete that
[00:17:23] lummetry color effect from multiple
[00:17:26] clips at the same time? Well, first I
[00:17:29] have to select those clips. So, I'm
[00:17:30] going to rightclick, go to label, select
[00:17:33] label group, but it selected not only
[00:17:36] the ones on V1, but also on V3, cuz
[00:17:39] that's the same color up there, too.
[00:17:40] Right. So, I'm going to lock V4, V3, and
[00:17:45] V2. And then rightclick, label, select
[00:17:49] label group. And then when I rightclick,
[00:17:52] I can go to remove attributes. And this
[00:17:56] will ask me, hey, which attribute would
[00:17:58] you like to remove? If I keep everything
[00:18:01] selected and I press okay, it'll remove
[00:18:04] everything, including my motion
[00:18:05] controls. Remember this shot right here?
[00:18:08] It's like zoomed in to 80%. So if I
[00:18:10] press okay,
[00:18:12] it'll change the cropping. So I have to
[00:18:15] select just the lummetry color. So I go
[00:18:17] to remove attributes. I don't want any
[00:18:20] of the motion or time remapping or
[00:18:22] anything. I just want you to get rid of
[00:18:24] the lummetry color effect. There we go.
[00:18:28] Now, let's say I came back. I looked at
[00:18:29] this on my phone and I decided that the
[00:18:32] entire video needs to be brighter.
[00:18:34] Instead of selecting everything by going
[00:18:36] command A and then pasting a lummetry
[00:18:40] color effect to every single clip. I can
[00:18:43] do that globally using an adjustment
[00:18:45] layer, which is very similar to
[00:18:46] Photoshop actually. First, I have to
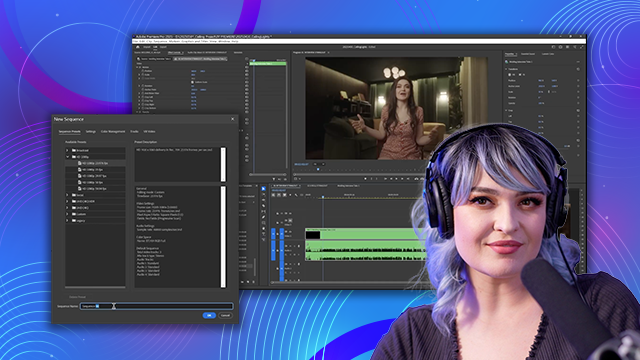
[00:18:48] create that adjustment layer. I'll put
[00:18:50] it in the graphics folder. I'm going to
[00:18:51] select the graphics folder. Go to new
[00:18:53] item and go to adjustment layer. I'm
[00:18:56] going to choose the properties of this
[00:18:57] adjustment layer. Width, height, and
[00:19:00] time base, the same as we've been
[00:19:02] working on this whole time. Press okay.
[00:19:04] And now this adjustment layer is its own
[00:19:07] item inside our bins. I'm going to put
[00:19:09] it on a new track that is above all the
[00:19:13] other tracks. So, I'm just going to drag
[00:19:14] it in. And by default, it is just a few
[00:19:17] frames wide because I have that set as a
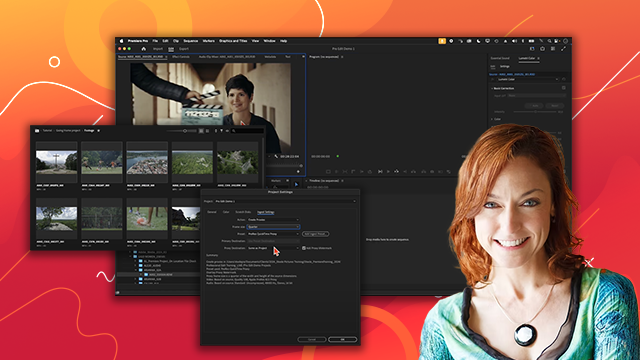
[00:19:21] default in my settings. If I wanted to
[00:19:23] change it before I made that adjustment
[00:19:25] layer,
[00:19:27] I could have gone to edit preferences
[00:19:31] and then timeline.
[00:19:34] And then here I can set a minimum still
[00:19:38] image default duration. So right now
[00:19:40] it's four frames. Let's actually make it
[00:19:43] 4 seconds. And my audio transition
[00:19:47] default duration is two frames, which is
[00:19:49] great because we'll be using that later.
[00:19:51] Going to press okay. And then create
[00:19:53] that adjustment layer again. Same thing,
[00:19:56] but now when I drag it in, it's a lot
[00:19:59] longer.
[00:20:01] So I can extend it to be the entire
[00:20:05] width of the video. And then I can place
[00:20:07] a lummetry color effect on that
[00:20:09] adjustment layer. And then everything
[00:20:11] underneath it will be affected by it.
[00:20:14] So, I could increase the exposure just a
[00:20:16] little bit across the whole thing.
[00:20:20] And that way, all the B-roll, all the
[00:20:22] A-roll, and everything will have a
[00:20:24] higher exposure. We're almost done.
[00:20:27] We've done most of this before,
[00:20:29] actually. It's just a review. Remember
[00:20:30] last time when we were creating little
[00:20:32] transitions by dragging these fade
[00:20:35] handles across like so, then copying it,
[00:20:40] zooming out, holding down command,
[00:20:44] selecting all of the transitions, and
[00:20:46] pasting so that that little fade
[00:20:48] transition would apply across all the
[00:20:49] clips. Well, here we're going to do the
[00:20:51] same thing except
[00:20:53] we're just going to apply the default
[00:20:56] transition
[00:20:58] here under the timeline where we just
[00:21:01] were. It says that our audio transition
[00:21:05] default duration is two frames, which is
[00:21:07] exactly what we need. So, we know how
[00:21:09] long our default transition is. We just
[00:21:11] need to know what our default transition
[00:21:13] is. So here under effects in audio
[00:21:17] transitions crossfade, this little blue
[00:21:20] circle shows us that the constant power
[00:21:23] transition is our default transition.
[00:21:26] How do we know that? Well, we could
[00:21:29] rightclick set as default transition. If
[00:21:31] we wanted constant gain, we could set
[00:21:32] that as default transition. Exponential
[00:21:34] fade, we could set that. I wouldn't
[00:21:36] worry about the differences between
[00:21:38] these for now. Let's just say constant
[00:21:40] power is our default transition. So, if
[00:21:42] we select the area between two of the
[00:21:45] audio clips and we just do shift D, that
[00:21:48] automatically adds that default
[00:21:49] transition without us having to drag
[00:21:52] those handles. So, if we wanted to just
[00:21:55] automatically add the default transition
[00:21:57] to everything, we press command, select
[00:22:00] all of the transitions, then shift D
[00:22:03] adds that two frame default fade
[00:22:05] transition to everything. I'll prove it.
[00:22:08] I'll just zoom in right here. The other
[00:22:10] thing we can do is clean up the audio a
[00:22:13] little bit. So, let's select all of the
[00:22:14] audio clips on A1, go to essential
[00:22:18] sound, and we can do enhance speech, but
[00:22:20] I want to show you a couple of the other
[00:22:22] things here in this menu. For example,
[00:22:24] we can reduce noise, we can reduce
[00:22:26] rumble, and of course, we're going to do
[00:22:28] the same thing as we did before. For
[00:22:29] loudness, we're going to click auto
[00:22:31] match so that each clip matches its
[00:22:34] loudness. And for enhanced speech, we're
[00:22:36] going to press enhance, but we're going
[00:22:37] to turn the mix amount down so that it
[00:22:40] doesn't sound as robotic. I know my
[00:22:44] voice can sometimes go pretty low and it
[00:22:47] sounds like a little frog that croakkes.
[00:22:49] The essential sound panel not only has
[00:22:51] music, but it also has sound effects.
[00:22:54] And so many of them are free. You can
[00:22:57] see there's over 15,000 sound effects.
[00:23:01] And when I filter it by what's free over
[00:23:05] 11,000. So let's get a short sound
[00:23:09] effect. And I want like a little chime
[00:23:12] or something interesting for that before
[00:23:14] and after shot here at the beginning. So
[00:23:17] I'm going to do the same thing. Make
[00:23:18] sure timeline sync is on. Go to
[00:23:20] categories and
[00:23:24] I don't know sound design.
[00:23:27] Boom. Impact. Let's listen.
[00:23:30] Like right here.
[00:23:33] This. No. This.
[00:23:38] This.
[00:23:40] This. I kind of like that. So, I will in
[00:23:44] the audio folder,
[00:23:46] I'm going to make a subfolder called
[00:23:48] sound effects. And then I'm going to put
[00:23:50] this sound effect in the sound effects
[00:23:53] folder.
[00:23:56] There it is. and then drag it
[00:23:59] right here
[00:24:02] to where my uh
[00:24:05] my new clip starts. Let's listen
[00:24:09] to this. Oh, that is loud. Let's uh drag
[00:24:14] the volume line down a little bit to
[00:24:17] this. In my last video, that was more of
[00:24:20] a vlog. Let's add some graphics. I've
[00:24:23] duplicated the sequence. I've called it
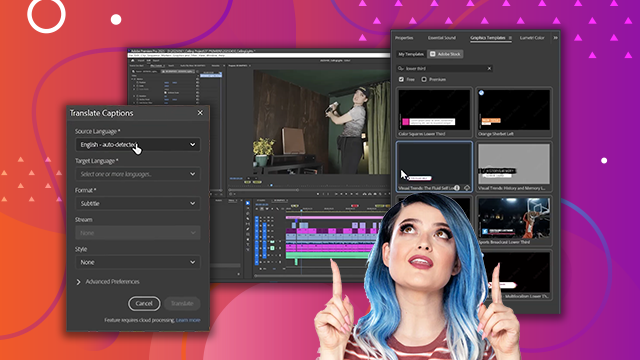
[00:24:25] graphics. And now I'm going to open the
[00:24:29] graphics templates window.
[00:24:31] Here it is. Let's put it up here. And
[00:24:35] Adobe Stock has a lot of graphics
[00:24:38] templates. And again, you can filter
[00:24:40] them by free or premium. So in this
[00:24:43] case, let's filter by free. And let's
[00:24:47] type in lower third.
[00:24:49] That is what we call a template for
[00:24:52] one's name at the bottom of the screen.
[00:24:54] You can hover scrub through it to kind
[00:24:57] of get an idea of what it looks like.
[00:25:00] Quite nice.
[00:25:03] Let's keep going. I think this popup
[00:25:06] lower third works really well. So, at
[00:25:08] the very beginning, I don't even say my
[00:25:11] name, so I'm going to have to write it
[00:25:12] on the screen. I'm going to drag that
[00:25:14] lower third into V6, which doesn't exist
[00:25:18] yet, but once I drag it, it will. And
[00:25:20] it's loading the template. And there we
[00:25:23] go.
[00:25:25] Welcome to my living room. I want to
[00:25:27] show you how I Great. Now that the
[00:25:30] template is in there, I can just click
[00:25:32] directly into it.
[00:25:34] And in the properties panel, I can
[00:25:36] change what it says. So, Valentina V.
[00:25:42] Second line
[00:25:44] filmmaker.
[00:25:47] And then I want to change the font, too.
[00:25:51] Um,
[00:25:53] let's do one of my favorite fonts.
[00:26:03] H. Maybe all caps
[00:26:06] and maybe smaller
[00:26:09] with a little bit more spacing in
[00:26:12] between.
[00:26:14] Nice. See what that looks like. Welcome
[00:26:17] to my living room. I want to show you.
[00:26:19] I'm actually going to get rid of that
[00:26:21] second line by disabling this eye. And
[00:26:24] then the whole thing I'm going to move
[00:26:26] down by doing a global position control.
[00:26:34] kind of like this because I still want
[00:26:35] to leave room for subtitles. Now, this
[00:26:37] graphic has both an intro animation and
[00:26:40] an outro animation. So, if I play it,
[00:26:43] this is what it looks like by default.
[00:26:46] Welcome to my living room. I want to
[00:26:48] show you how I took it from looking like
[00:26:51] this to this in you see that. So I have
[00:26:56] to make it shorter.

 AdChoice